Year 8 Lessons - Term 3
( if you miss the lesson for any reason you should still complete both classwork and homework)
Boys without access to a printer (or indeed any boy) can send me research information (text and pictures) to print. A maximum of three pages will be printed and boys must use the A4 Powerpoint Template below. Don’t forget to include your name and form and carefully size any pictures you need printing. Any printing required must be received at least 24hrs before the lesson.
INFORMATION FOR PUPILS & PARENTS
please watch the video below for an overview of work that should have been completed by students during Term 2
Lesson 1
Classwork : Students watch the ‘Introduction to Land Art’ video and discuss ‘what is Land Art?’ to ensure pupils have a clear grasp of the topic. When watching the video students should take notes in the back of the sketchbook (students should aim to write down 20 bullet points from the video noting information such as a ’Land Art Definition’, "‘What are the History/Origins of Land Art’, ‘Examples of Famous Land Artists and their work’, and ‘Alternative names for Land Art’).
Then students watch the Land Art Heading video. Pupils to start to produce the Land Art heading across a double page in their sketchbooks.
Homework : Students watch Land Art - Research Guidance video. The video also explains the research requirements. There are 4 sections – ‘What is Land Art’, ‘ My 5 Favourite Pieces of Land Art’, ‘Research into a specific Land Artist’ and ‘10 Important Facts about Land Art’. Information on what you might include in these 4 sections can be seen below,


The homework is to start research on ‘What is Land Art’ (pictures and information). This section of the research will be completed on the double page next lesson under the Land Art Heading. Pupils should also aim to complete the majority of the Land Art heading for homework.
Deadline : The deadline will always be your next Art lesson unless stated otherwise on MILK.
Lesson 2
Classwork : Students complete any improvements to the Land Art heading across a double page in their sketchbooks and start to present research on ‘What is Land Art’.
Students will have the next three lessons to effectively manage their time to complete the double page of Land Art research. Homework should be used to research relevant information for the 4 sections of research explained in Lesson 1. Classwork will be to present this work in sketchbooks. There are 3 examples below,

Secure overall (some parts are Secure+) but Section 4 looks incomplete, as does the Land Art title at the bottom of page 1
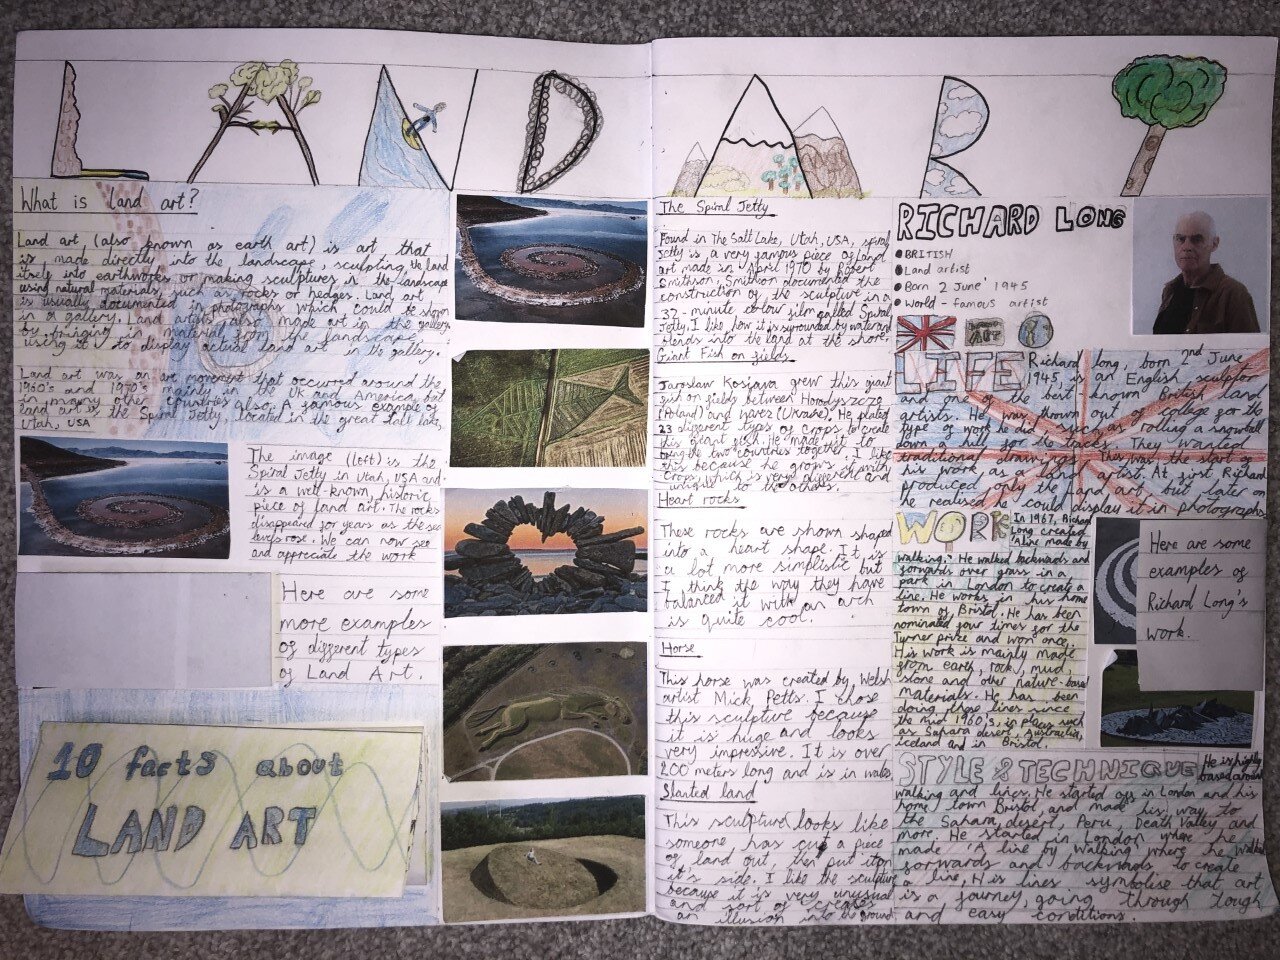
Excellence overall with flap-out sections containing extra detail and pictures (flap-outs are shown open in the next picture)


Excellence+ overall with two large flap-outs effectively creating double the space for extra detail and pictures (flap-outs are shown open in the next picture)

Homework: Continue with Land Art research work. Start by completing the section 'What is Land Art?' and also collect all pictures needed for the three remaining sections - ‘ My 5 Favourite Pieces of Land Art’, ‘Research into a specific Land Artist’ and ‘10 Important Facts about Land Art’.
REMEMBER - Boys without access to a printer (or indeed any boy) can send me research information (text and pictures) to print. A maximum of three pages will be printed and boys must use the A4 Powerpoint Template below. Don’t forget to include your name and form and carefully size any pictures you need printing. Any printing required must be received at least 24hrs before the lesson.
Deadline : The deadline will always be your next Art lesson unless stated otherwise on MILK.
Lesson 3
Classwork : This is the second of 4 lessons for students to complete the Land Art research work. Students should be working on the ‘ My 5 Favourite Pieces of Land Art’ section in class.
Homework: Continue with Land Art research work. Complete the ‘ My 5 Favourite Pieces of Land Art’ section and start the section on the ‘Research into a specific Land Artist’.
Deadline : The deadline will always be your next Art lesson unless stated otherwise on MILK.
Lesson 4
Classwork : This is the third of 4 lessons for students to complete the Land Art research work. Students should be working on the ‘Research into a specific Land Artist’ section in class.
Homework: Continue with Land Art research work.
Deadline : The deadline will always be your next Art lesson unless stated otherwise on MILK.
Lesson 5
Classwork : This is the last of 4 lessons for students to complete the Land Art research work. Students should be working on the ‘10 Important Facts about Land Art‘ section in class.
Homework: Complete all Land Art research work.
Deadline : The deadline will always be your next Art lesson unless stated otherwise on MILK.
Lesson 6
Classwork : Students are shown the Land Art - Student Example work video below.
During half term students have to produce, photograph and explain their own piece of Land Art. Work can be presented in sketchbooks or on a Powerpoint (if boys do not have access to a printer).
For the remainder of the lesson students can make any final improvement to the Land Art research work or improve any areas of sketchbook work from previously in Year 8. When books are collect for marking after half term it will be for writing the end of year report.
Homework: Students must produce, photograph and explain their own piece of Land Art over the holiday. Work can be presented in sketchbooks or on a Powerpoint (if boys do not have access to a printer).
Deadline : The deadline will always be your next Art lesson unless stated otherwise on MILK.
HALF TERM
Lesson 7
Classwork : Students discuss logos and the characteristics of what makes a good logo.
They are then shown the Airline Logo Quiz video below, pausing the video to discuss the characteristics and meaning of each logo design.
Students then watch the ‘10 FAMOUS AIRLINE LOGOS WITH A HIDDEN MEANING !!’ video.
Airline Logo Quiz
10 FAMOUS AIRLINE LOGOS WITH A HIDDEN MEANING !!
Finally students decide on an airline ‘tail fin’ logo they might wish to design. This can be for a new or an existing airline (country or company airline). Finally students start a brainstorming/mind mapping page in sketchbooks
Ultimately students will be expected to produce two design ideas (acting as DESIGNERS), discuss these ideas with their teacher (acting as the CLIENT), and then produce a final design and explanation. Graphic designers call this a ‘SOLUTION’.
Student now have an additional four lessons to complete this work.
Homework: Students continue with the brainstorming/mind map page in sketchbooks. Think about your ideas for airline ‘tail fin’ logo for a new or an existing airline (country or company airline) in term of 5 things - Lettering, Shape, Colour, Culture, and Flying/Travel.
The Air Chine logo brainstorming/mind map might have looked like the design below (the ideas in ’red’ are what influenced the final design).

Students may also chose to collect/print any research pictures or lettering styles they might need for their logo design work.
REMEMBER - Boys without access to a printer (or indeed any boy) can send me research information to print. A maximum of TWO pages will be printed and boys must use the A4 Powerpoint Template from above (LESSON 2). Don’t forget to include your name and form and carefully size any pictures you need printing. Any printing required must be received at least 24hrs before the lesson.
Deadline : The deadline will always be your next Art lesson unless stated otherwise on MILK.
Lesson 8
Classwork : Students to start to produce two initial logo design ideas for a new or an existing airline (country or company airline).
The designs should be produces on half a sketchbook page, along with a brief written explanation (called a ‘solution’) for each.

Student should also continue to add any additional ideas to the brainstorming/mind mapping page in sketchbooks.
Student now have an additional three lessons to complete this work.
Homework: Students aim to complete the first logo design idea and make a start the second.
Deadline : The deadline will always be your next Art lesson unless stated otherwise on MILK.
Lesson 9
Classwork : Students should complete the second logo design idea.
Student should also continue to add any additional ideas to the brainstorming/mind mapping page in sketchbooks.
During the lesson (or at the beginning of Lesson 10) students will be expected to present the two design ideas (acting as DESIGNERS) and discuss these ideas with their teacher (acting as the CLIENT), and then start to produce a final design and explanation (examples are shown in Lesson 10). Graphic designers call this a ‘SOLUTION’.
Student now have an additional two lessons to complete this work.
Homework: No homework unless students still need to complete the classwork. Some students may choose to start work on the final logo design if their design idea has been approved.
Deadline : The deadline will always be your next Art lesson unless stated otherwise on MILK.
Lesson 10
Classwork : Students start to complete the final logo design idea and a final written ‘SOLUTION’. See examples below (remember the examples below also show 1. a paragraph describing the company’s ‘corporate identity’ and 2. a version of the design produced on a computer - these aspects are OPTIONAL this year) .
Student should also continue to add any additional ideas to the brainstorming/mind mapping page in sketchbooks.

6/10 - Good idea but the design is too complicated, the lettering and colour doesn’t stand out, and the solution fails to explain the meaning behind the logo.

7/10 - Good eye-catching design. This would be a Secure plus if the solution better explained the ideas.

8/10 - Eye-catching design and even includes a section that could be seen as the EasyJet (EJ) initials. Lettering isn’t quite accurate enough (different thicknesses) for the Excellence levels.

10/10 - Excellent design work. Simple, effective and eye-catching with the ‘w’ letter ending with a small plane motif

11/10 - A wonderful idea and outstanding presentation. This logo is certainly eye-catching, clever and memorable.
Homework: Student continue to work on the final logo design and written ‘SOLUTION‘.
Deadline : The deadline will always be your next Art lesson unless stated otherwise on MILK.
Lesson 11
Classwork : Students continue to work on the final logo design idea and a final written ‘SOLUTION’.
Student should also continue to add any additional ideas to the brainstorming/mind mapping page in sketchbooks.
Homework: Student complete the final logo design and a written ‘SOLUTION‘.
Students may also chose to produce the final logo design and ‘SOLUTION‘ on a computer. This is in addition to the final design and ‘SOLUTION‘ produced in sketchbooks. All of the example shown in Lesson 10 this optional piece of extension work.
Remember the SOLUTION is a paragraph of written information that explains the final logo. Include the following information.
The reasons for choosing the shape/design of the logo
The reason for choosing the colour(s) of the logo
Explanation of any clever meaning in or behind the design
How the logo is suitable for the specific airline company
Deadline : The deadline will always be your next Art lesson unless stated otherwise on MILK.
Lesson 12
Classwork : This is the last lesson of the Year 8. Student will use the time as a general opportunity to complete work.
Homework: There is no homework this week.
Deadline : The deadline will always be your next Art lesson unless stated otherwise on MILK.