Year 7 Lessons - Term 3
( if you miss the lesson for any reason you should still complete both classwork and homework)
Easter Homework
Most classes were asked to complete all of the still-life painting objects (except for the teddy bears) over the Easter Break. Over the next three lessons students will complete the teddy bear still-lifepainting.
Lesson 1
Classwork : Students start by paint ing paint the nose of the large teddy bear or the head of the small teddy bear. Use the demonstration videos shown below and don’t forget that it is important that you show the practice painting as well as the painted objects in the final painting.
Large Teddy Bear Nose Fabric Demonstration Painting
Large Teddy Bear Fur Demonstration Painting
Small Teddy Bear Demonstration Painting
Homework : Students complete the classwork above and also need to revise for the Artists’ Colour Test. The pass mark is 80% or (or 16/20) and spelling and learning the artists’ first and second names is important. There will also be 5 bonus questions based on the information contained in the ‘Artists’ Colour Slide Show’ from lesson 4.
Students should attempt the two ‘Artists’ Colour Practice Test’ below.
Practice 1 - Artists Colour Test
Practice 2 - Artists Colour Test
Deadline : The deadline will always be your next Art lesson unless stated otherwise.
Lesson 2
Classwork : Students sit the ‘Artists’ Colour Test’. The pass mark is 80% or (or 16/20) and spelling and learning the artists’ first and second names is important. There will also be 5 bonus questions based on the information contained in the ‘Artists’ Colour Slide Show’ from lesson 4.
Homework : Students aim to complete one of the teddy bears. Remember next lesson is the last lesson on this painting it is important that you show the practice painting as well as the painted objects in the final painting.
Deadline : The deadline will always be your next Art lesson unless stated otherwise.
Lesson 3
Classwork : This is the last lesson on the still life teddy bear painting.
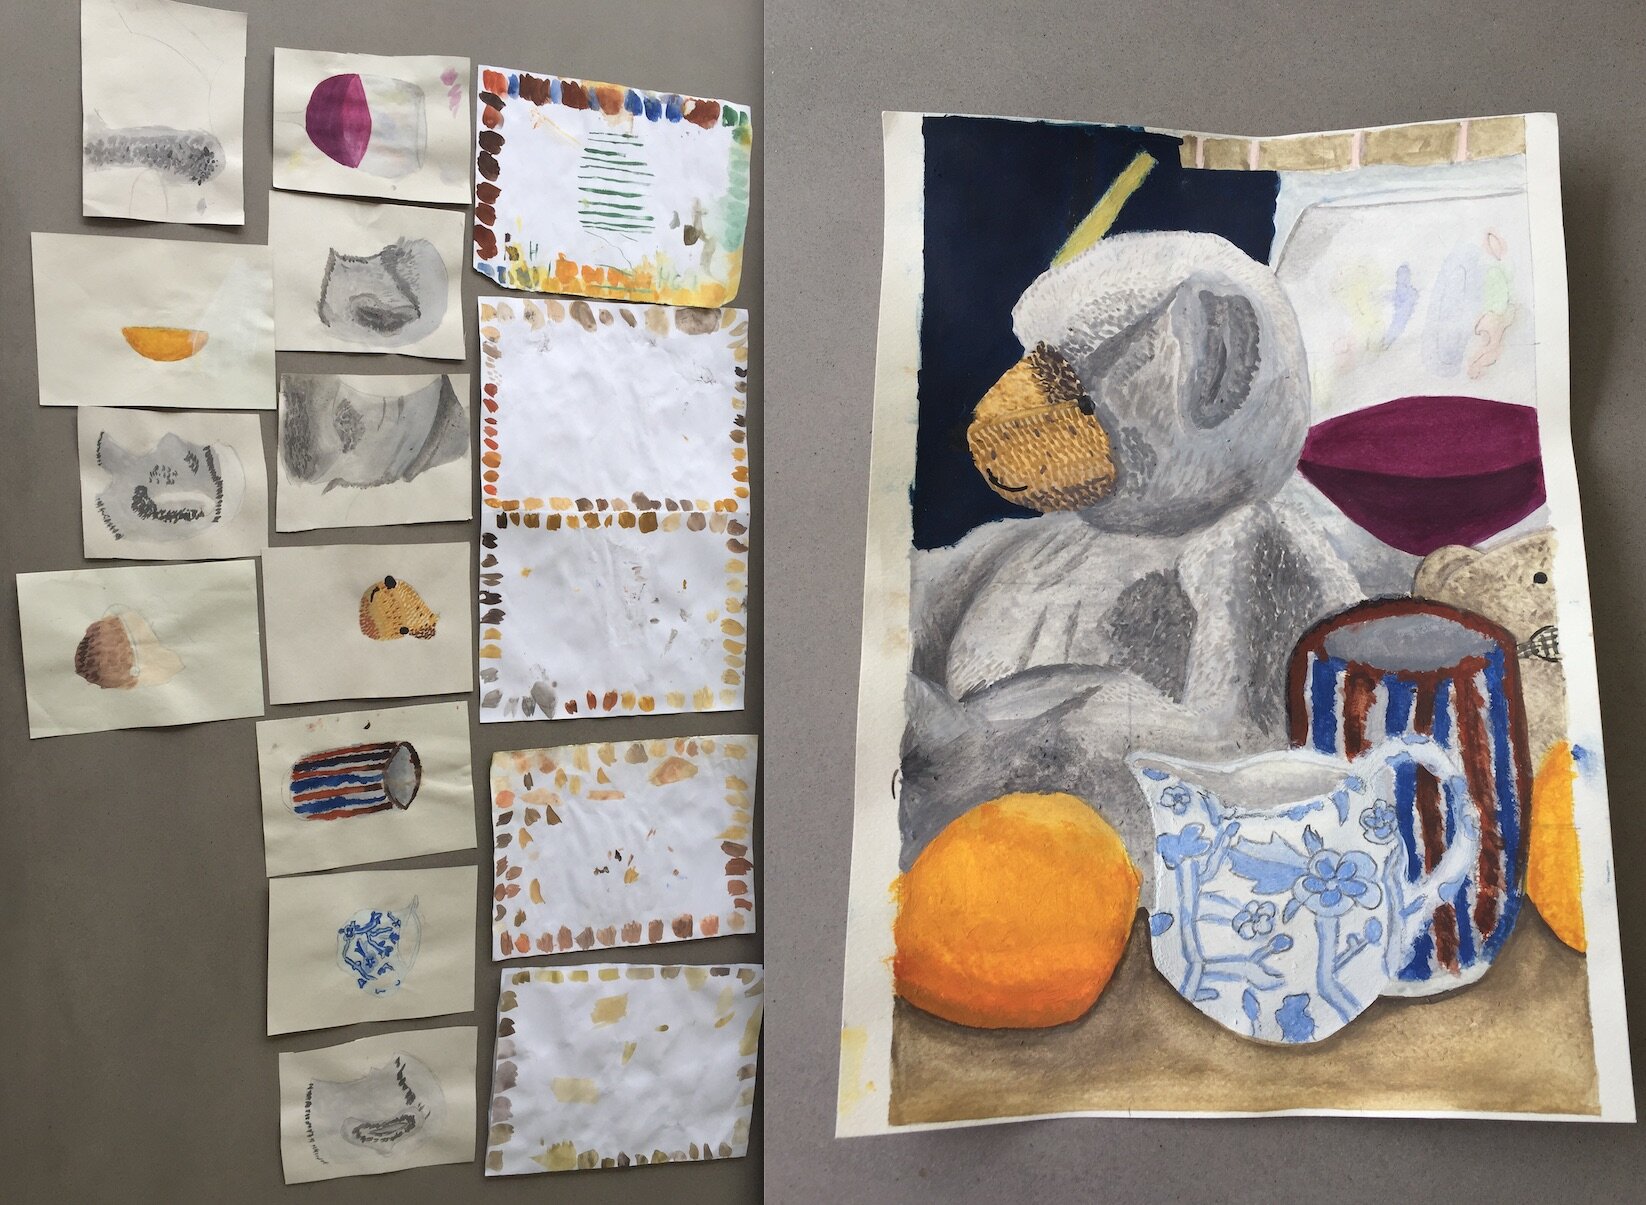
Homework : Students complete the painting and work must be stuck into sketchbook and all mixing colour and practice paintings must also be submitted as seen in the picture below.
Deadline : The deadline will always be your next Art lesson unless stated otherwise.
Lesson 4
Classwork : Students learn how to formally analyse a work of art. Firstly they watch the ‘How to Analyse a Painting’ video and then take notes when watching the two Vincent van Gogh videos below. Students should make notes on van Gogh’s life from the ‘15 Things You Didn't Know About Vincent van Gogh’ video, and on his techniques from the ‘Vincent van Gogh’s Style of Painting’ video. The aim should be to record 10 -20 pieces of information from each video.
How to Analyse a Painting
15 Things You Didn't Know About Vincent van Gogh
Vincent van Gogh’s Style of Painting
Homework : Choose a well known van Gogh painting to analyse and collect relevant facts about the painting in preparation for completing the full written analysis essay over the next two lesson. Use the ‘Analyse of a van Gogh Painting Research Sheet’ below to collect information.

Deadline : The deadline will always be your next Art lesson unless stated otherwise on MILK.
Lesson 5
Classwork : Student start to write the van Gogh painting analysis (most student write 2-3 pages). Students will have general class research notes on van Gogh and specific research notes on a van Gogh painting. See examples below,
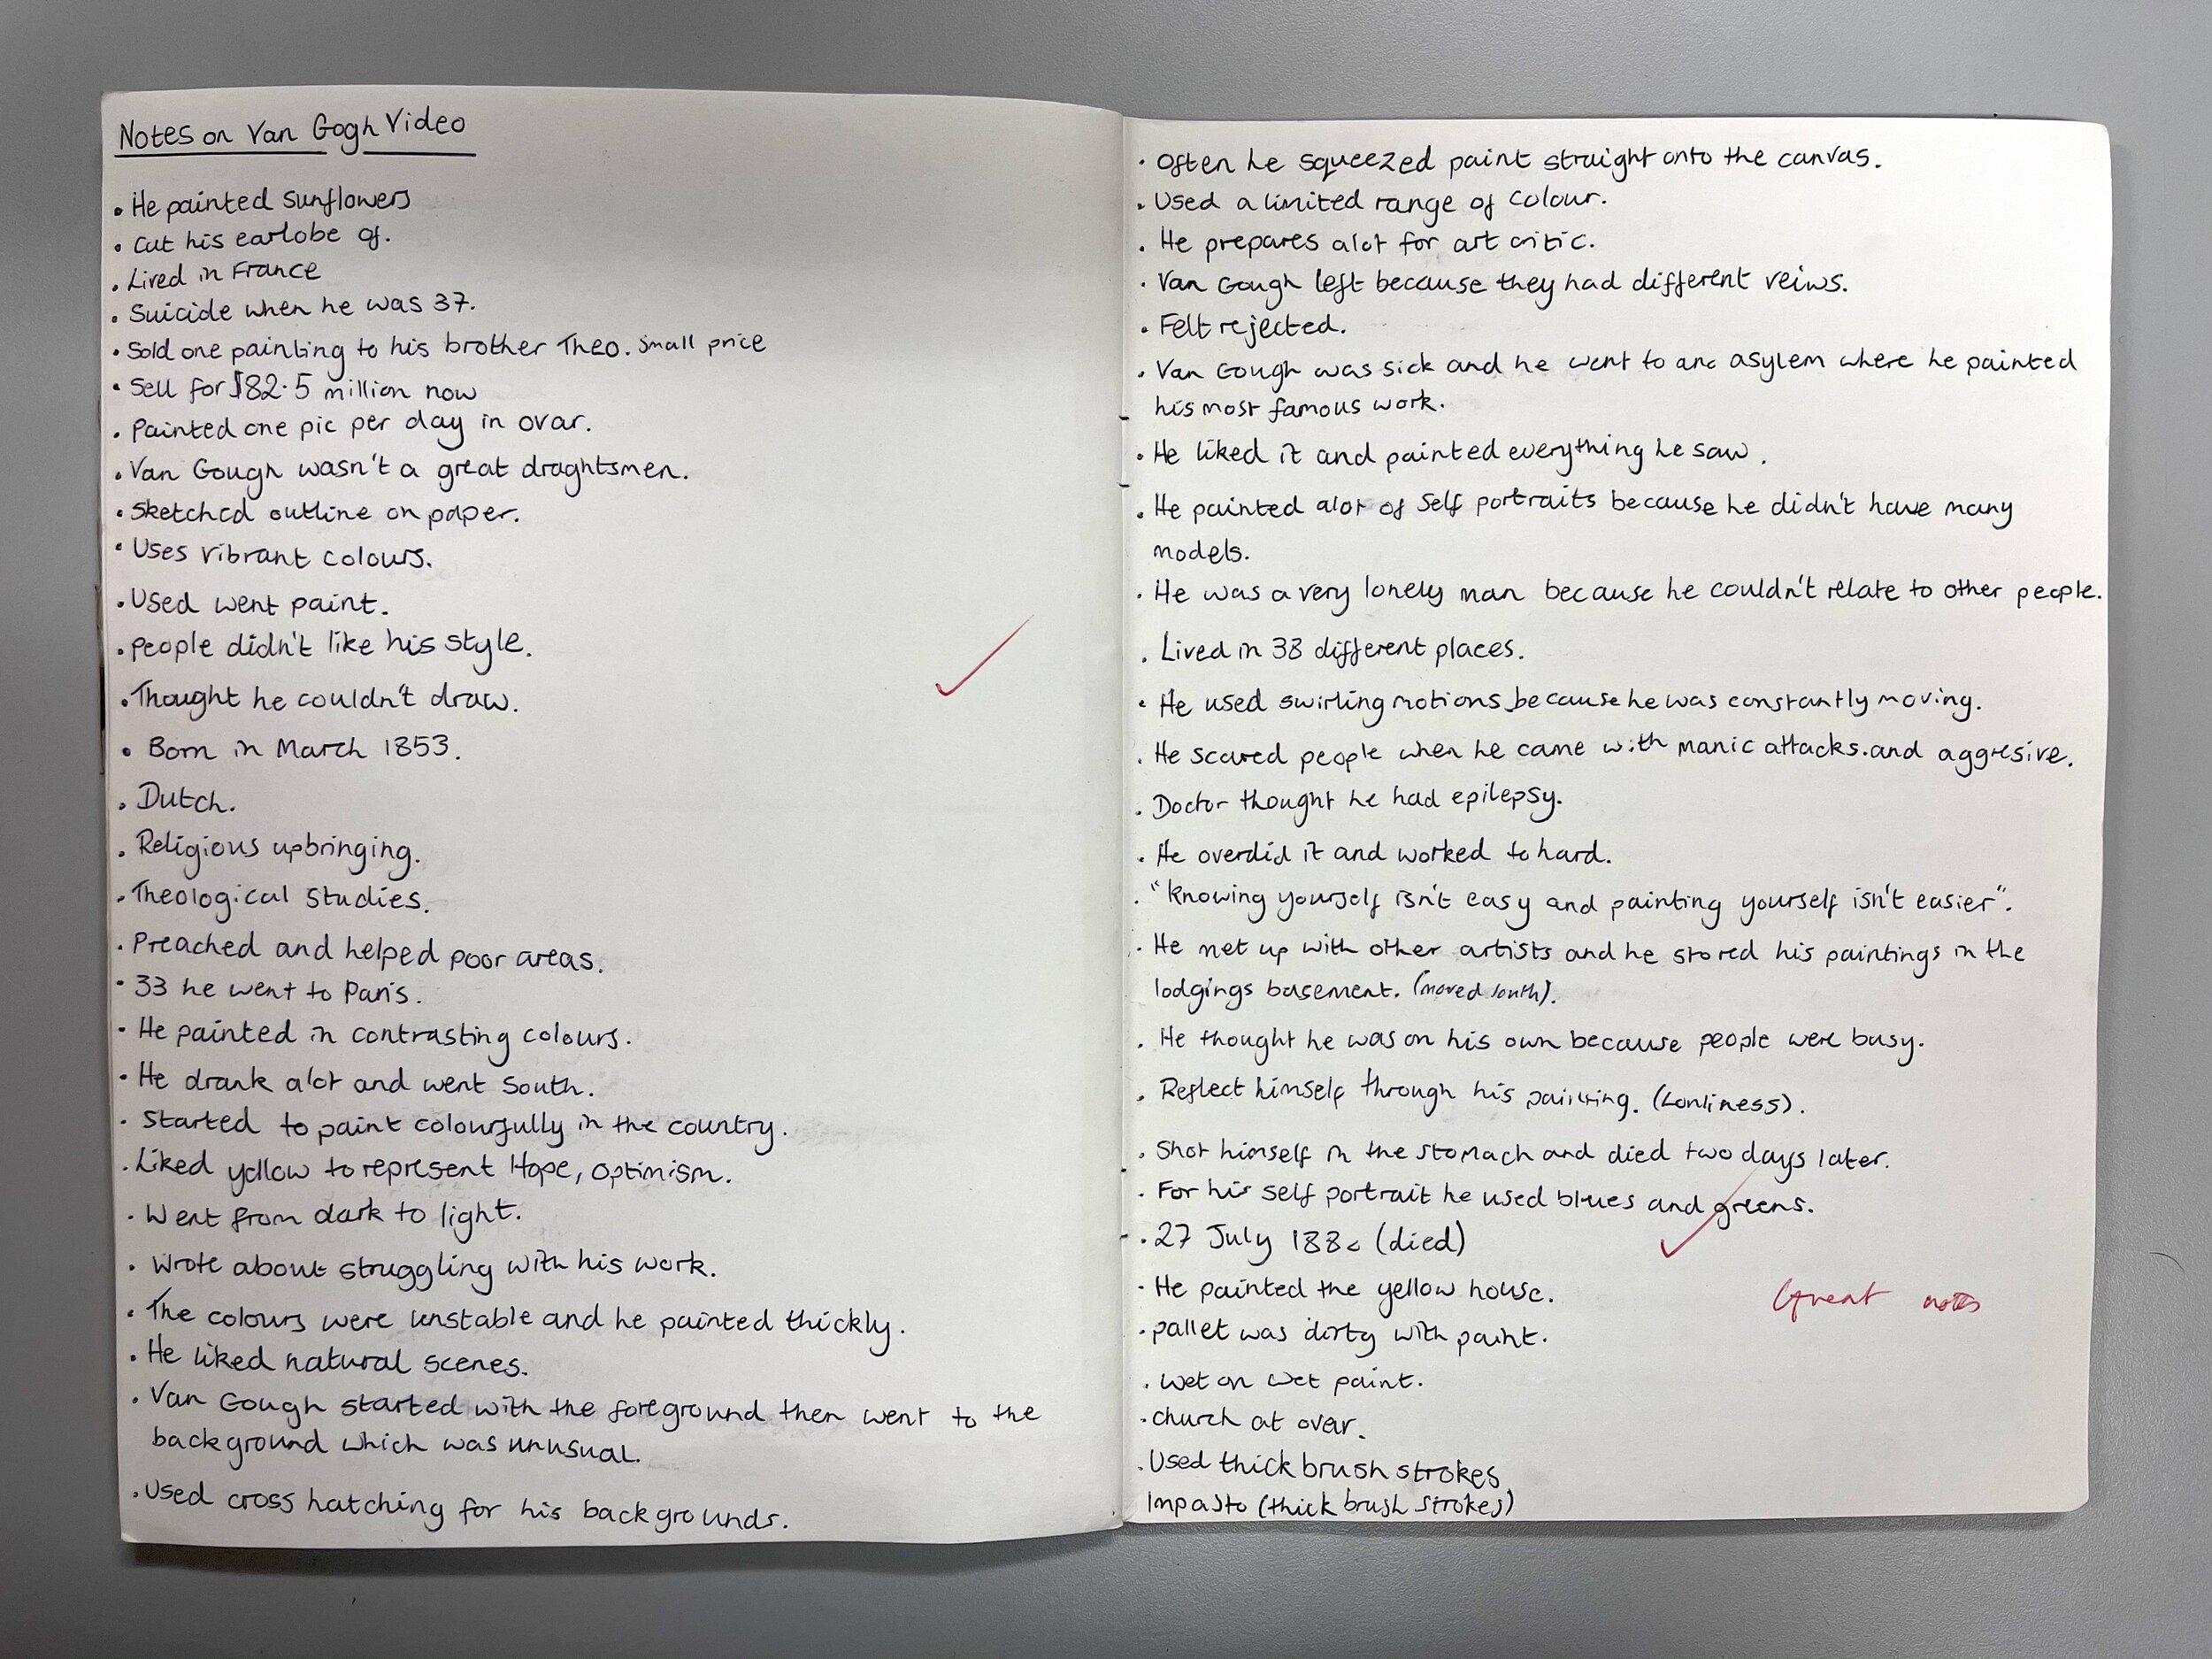
1. Initial class notes on van Gogh’s life and general artwork and techniques (20 - 40 bullet points on one or two sketchbook pages).
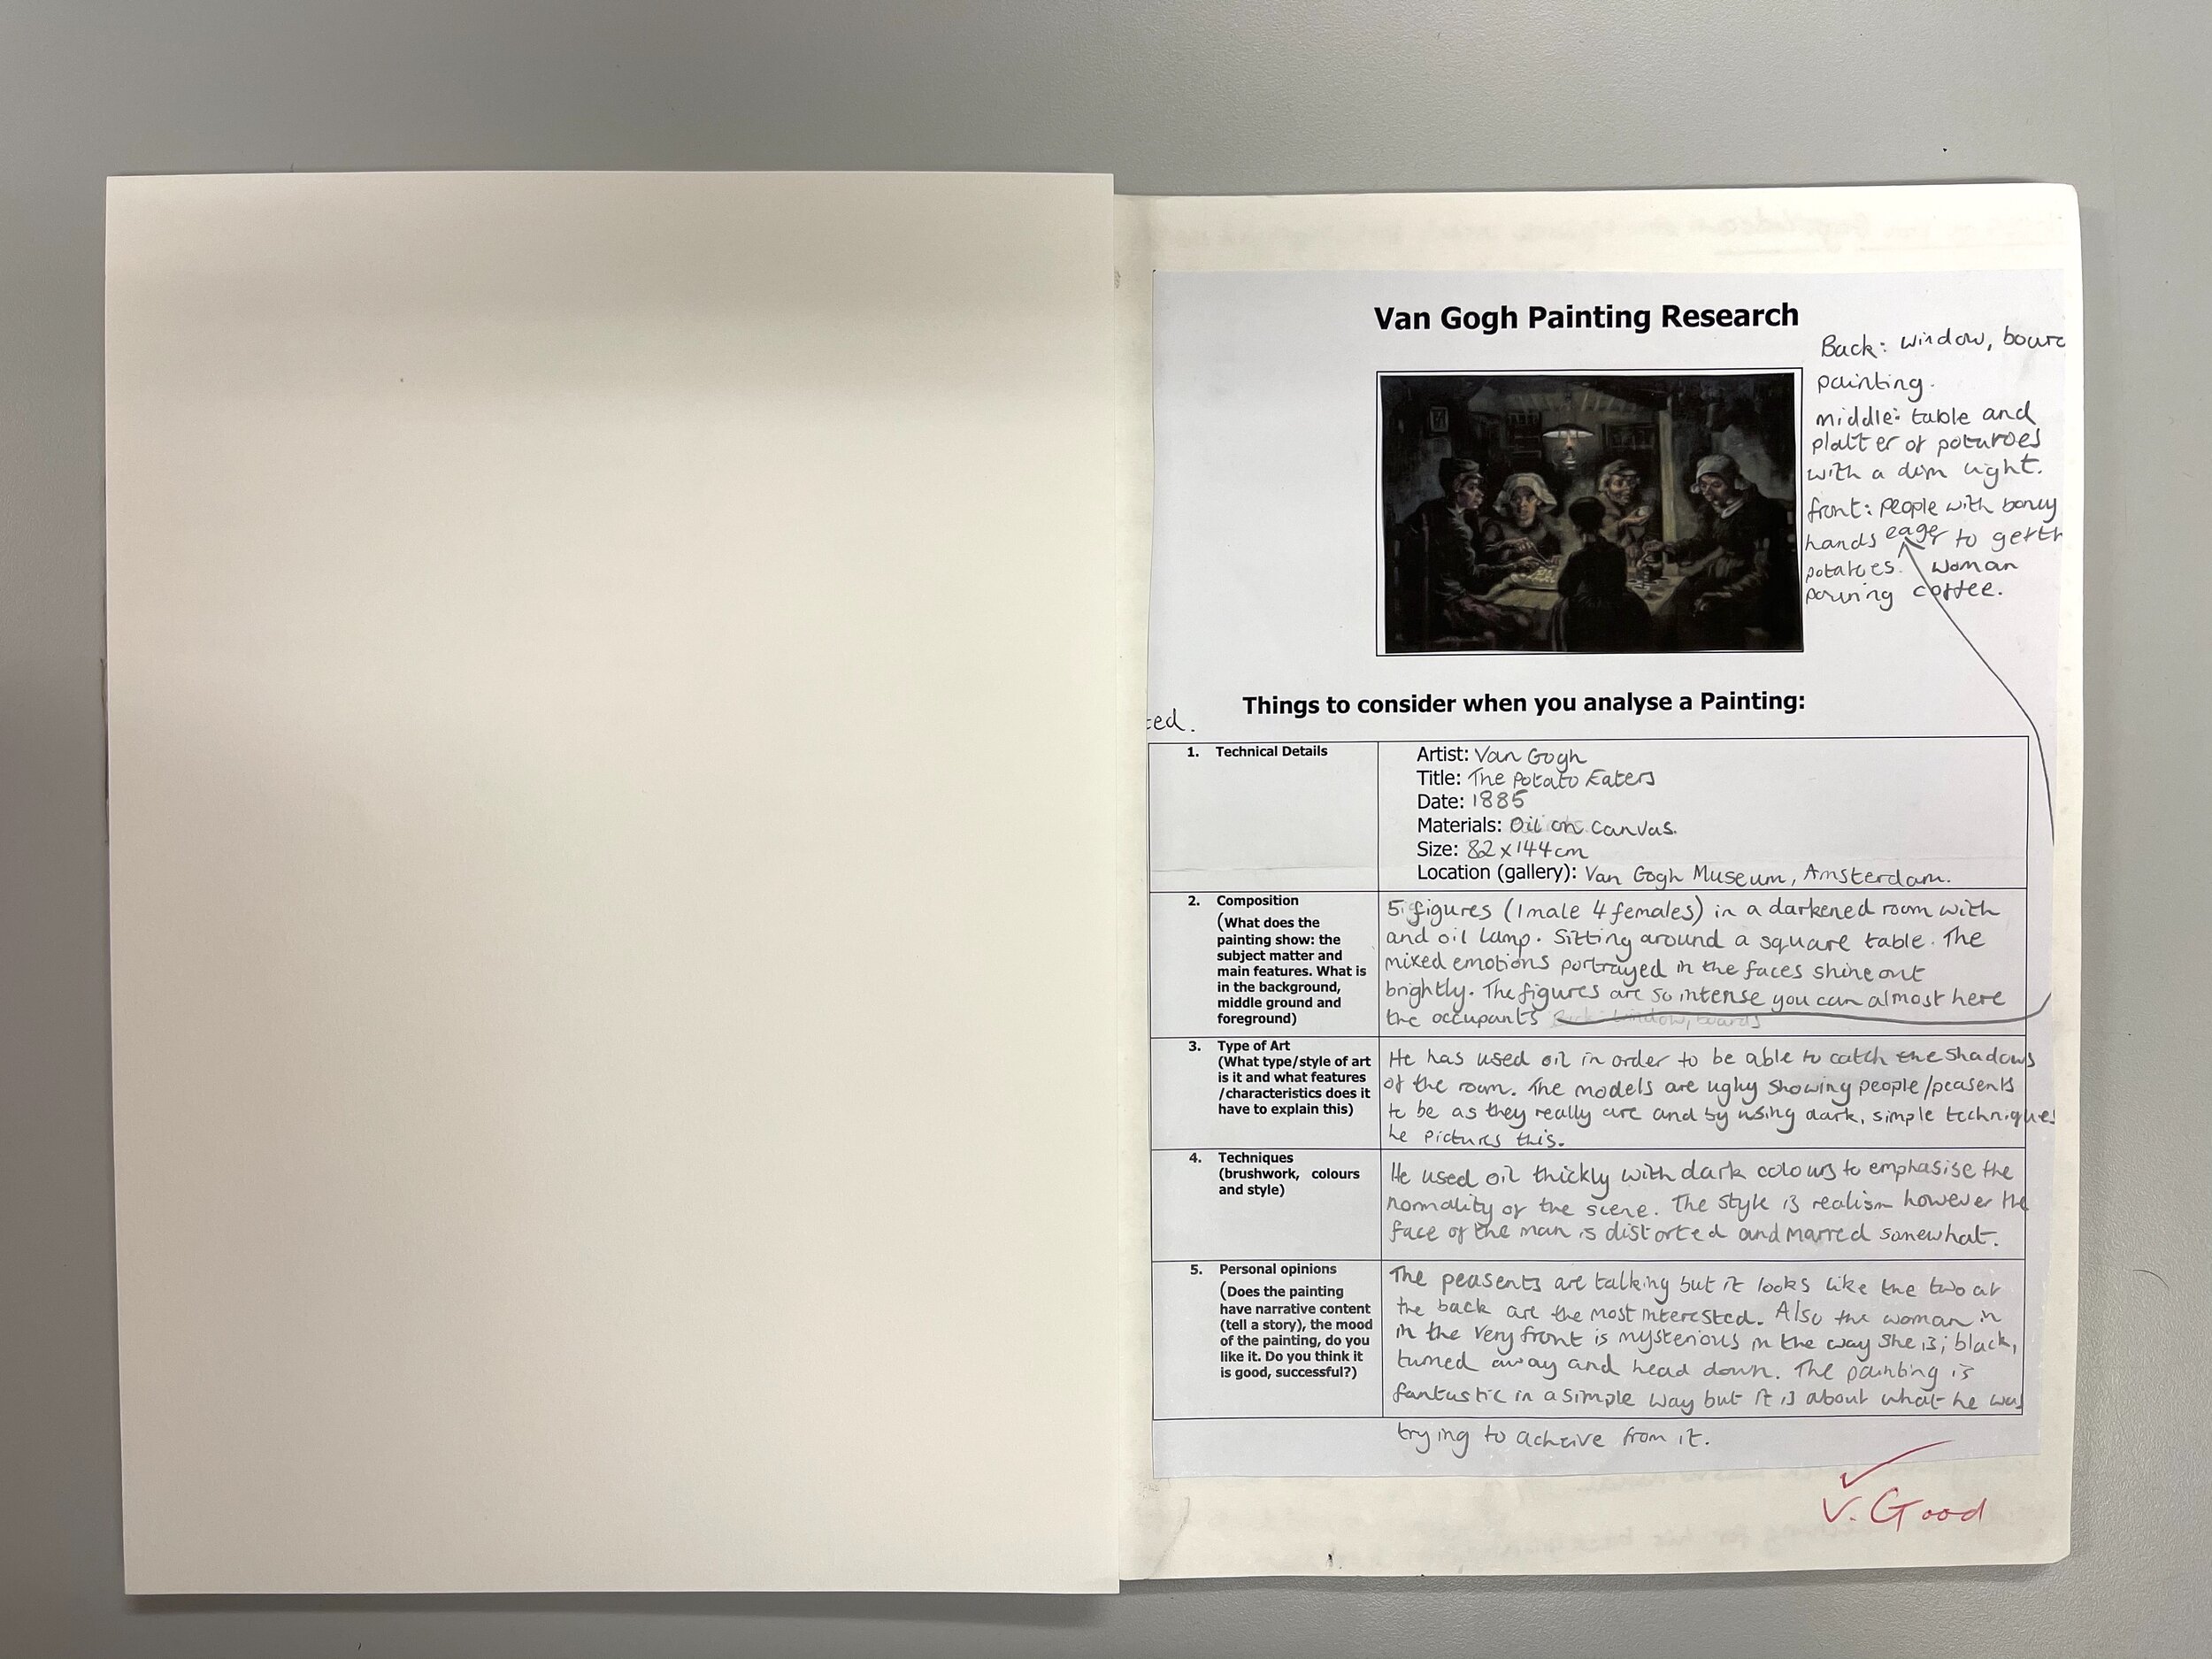
2. Homework notes on the ‘Analyse of a van Gogh Painting Research Sheet’
Homework : No homework unless students feel they need to do extra research for the van Gogh painting analysis.
Deadline : The deadline will always be your next Art lesson unless stated otherwise on MILK.
HALF TERM
Lesson 6
Classwork : Student complete the van Gogh painting analysis. Those students who finish before the end of the lesson can start the heading part of the Portrait Proportions Worksheet for Lesson 4 (using guidelines and high quality lettering/ presentation).
Homework : Complete van Gogh painting analysis
Then use two different colour pencils (yellow and red) to underline/highlight the 3 best examples of descriptive personal comments (yellow pencil) and also the 3 best examples of research information such as facts or quotes (red pencil). See example below,


Deadline : The deadline will always be your next Art lesson unless stated otherwise on MILK.
Lesson 7
Classwork : Watch the Portrait Proportions Worksheet Guidance video below. Then produce a copy of the Portrait Proportions Worksheet. This will enable you to show an accurate understanding of the proportions of the human head and also show you can present the information in an accurate and precise way.
Remember the video demonstration shows that students do not need to copy the three skull drawings and skull written work.

Portrait Proportions Worksheet
Portrait Proportions Worksheet Guidance
The most common mistakes pupils make and loose marks are,
1. Not spending enough time doing an accurate heading and adding colour neatly
2. Not writing in pen and using guidelines
3. Getting the proportions of the head 'on the wrong lines'
4.Producing a sketch rather than an accurate 'line drawing'
Homework : There is no homework. Book will be collected for marking.
Deadline : The deadline will always be your next Art lesson unless stated otherwise on MILK.
Lesson 8
Classwork : Students continue to produce a copy of the Portrait Proportions Worksheet started in Lesson 4. The emphasis of the work is only quality, accuracy and above all presentation skills.
Homework : Complete the Portrait Proportions Worksheet. Below are examples of completed worksheets so that students can judge the relevant standard of their work.

EXCELLENCE good proportions and accurate extra details (hair and ears), good presentation (guidelines used and a bold accurate and outlined heading)

EXCELLENCE- good proportions and accurate extra details (although chins no not quite line up), good presentation (guidelines used and a bold accurate heading)

SECURE+ good proportions and accurate extra details (but no ears), good presentation (heading could be bolder and outlined for an Excellence level)

SECURE good proportions but profile view lacks some accuracy, good presentation (guidelines used and a bold accurate )
Deadline : The deadline will always be your next Art lesson unless stated otherwise on MILK.
Lesson 9
Students will also be given a sheet of pictures of eyes, noses, mouths and ears (students with access to a printer may alternatively wish to collect their own pictures).
Watch the Drawing Facial Features Demonstration video. Split the next page in your sketchbook into four (as described in the video) and produce a highly detailed drawing of an eye. You are only drawing an eye this week.
Homework : Complete the eye drawing.
Also for those of you wanting to achieve a 12 or even a 15 out of 10, this is how.
Lesson 10
Students watch the Mouth Drawing Demonstration video below. They then produce a highly detailed drawing of an mouth (below the eye drawing from last lesson).
Mouth Drawing Demonstration Video
Homework : Complete the mouth drawing.
Deadline : The deadline will always be your next Art lesson unless stated otherwise on MILK.
Lesson 11
Classwork : Students should already have drawn the eye and mouth on one page. On the next page in your sketchbook again the page split into four (but this time I suggest you use it in a portrait/upright format). This weeks work is to produce a highly detailed drawing of a nose (in front view) from a photograph and present these next to one another in your book. You may want to watch the Drawing Facial Features Demonstration video again from the 9mins 30secs point.
This is also a good link for the nose drawing.

Homework : Complete the nose drawing and draw the ear. There is not a link or demonstration for the ear drawing (students may wish to find one themselves). There are examples shown in the Drawing Facial Features Demonstration video from the 11mins 25secs point.
Deadline : The deadline will always be your next Art lesson unless stated otherwise on MILK.
Lesson 12
Classwork : Students will use this lesson to improve the facial features studies.
Homework : No homework. Book will be collected for marking.
Deadline : The deadline will always be your next Art lesson unless stated otherwise on MILK.
Lesson 13
Classwork : Using the photography that was taken of yourself, stick this into your sketchbook. Use a double page (boys who are right-hand will want to stick the photo on the left-hand page, and boys who are left-hand may want to stick the photo on the right-hand page). Draw out the grid on the photograph and then the ‘double size’ grid on the opposite page in your sketchbook. This week your are only drawing out the grids accurately. All is explained in the ‘Portrait Gridded Enlargement 1’ video below.
Some student may choose to start the enlargement outline (work lightly!) shown in Lesson 10.
Portrait Gridded Enlargement 1
Homework : Complete the grid.
Deadline : The deadline will always be your next Art lesson unless stated otherwise on MILK.
Lesson 14
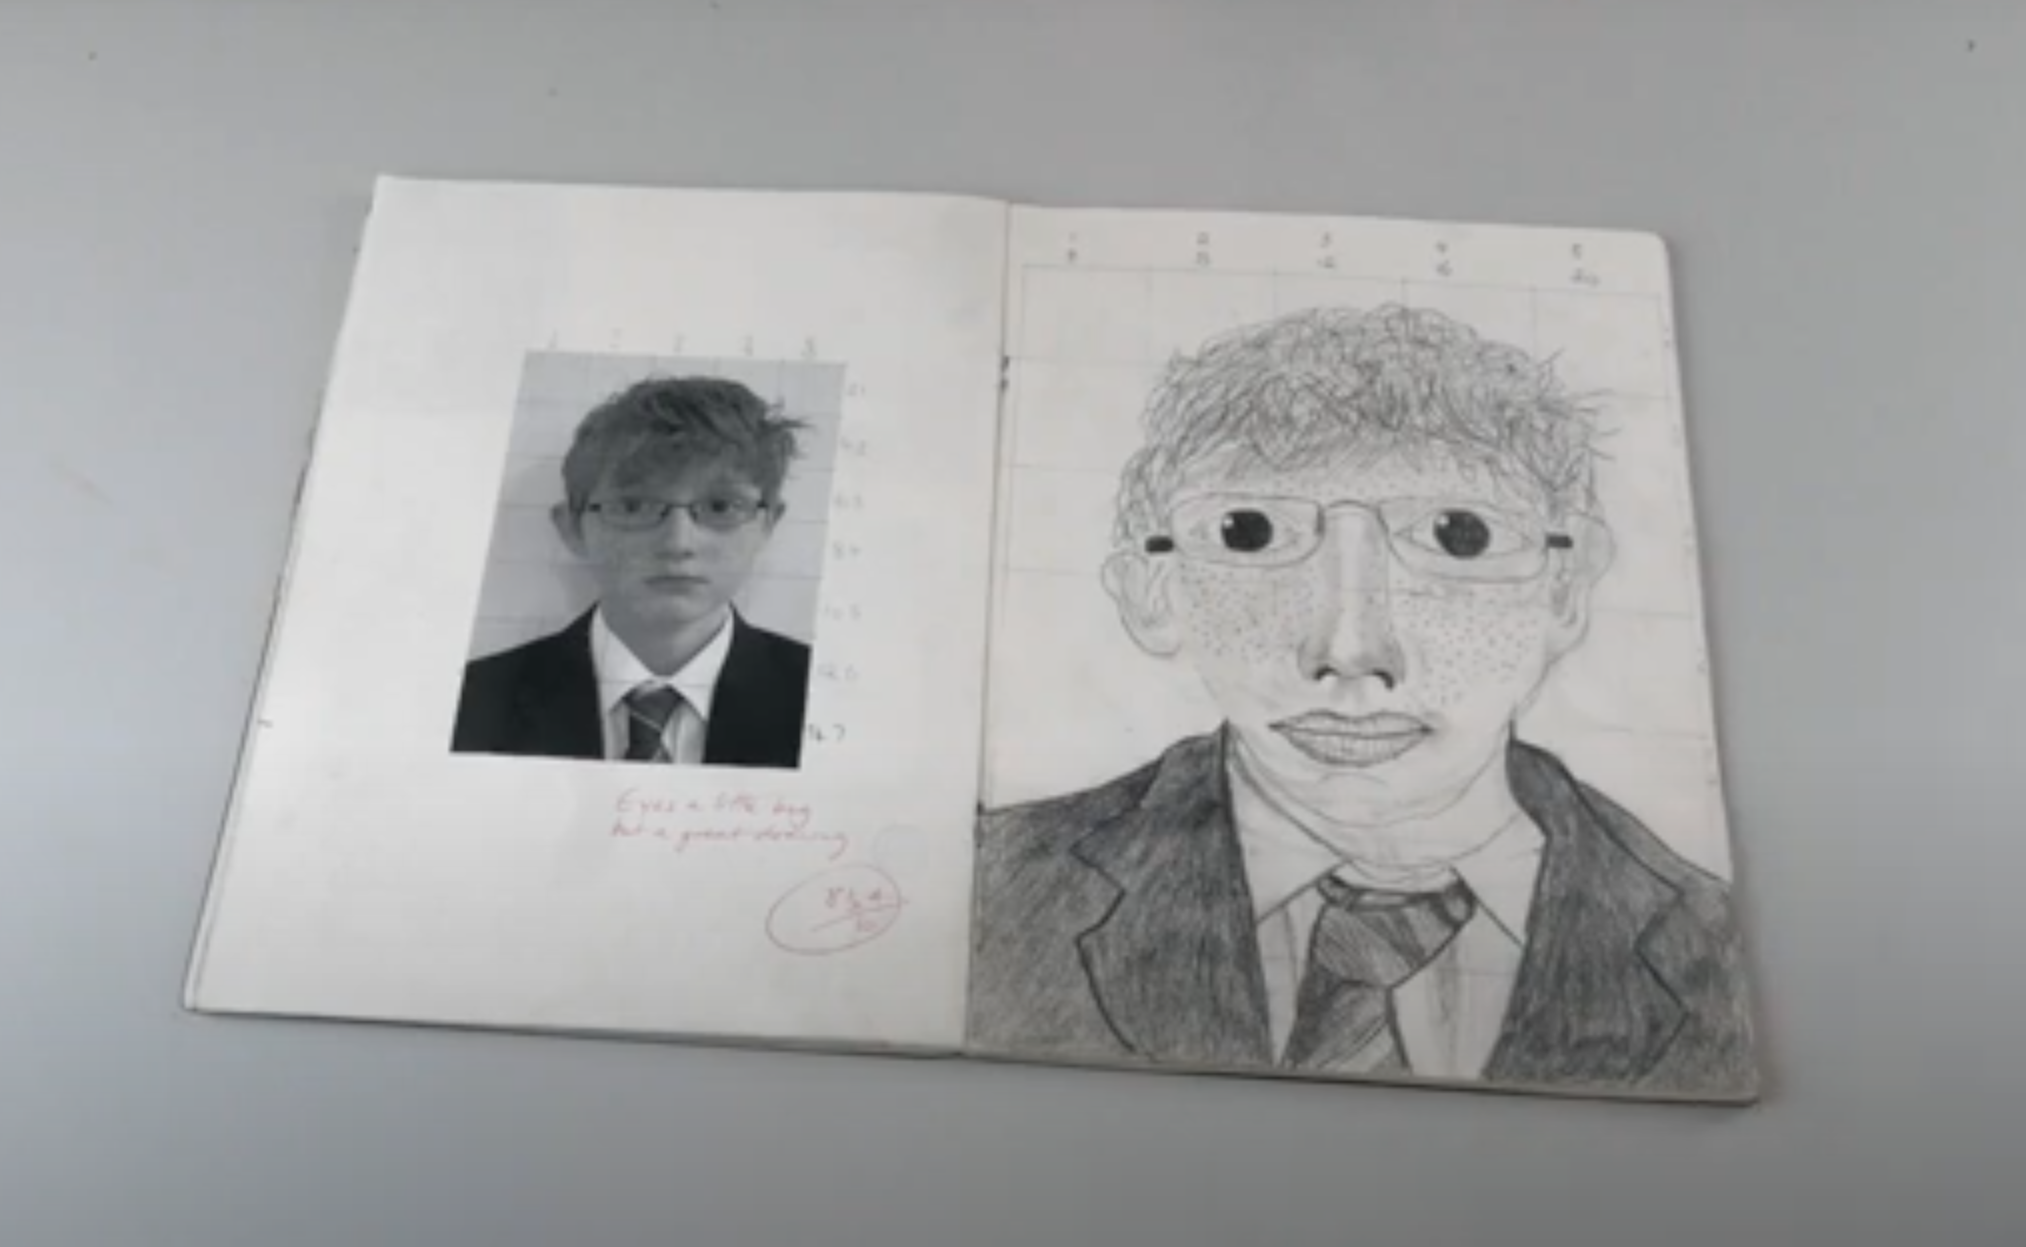
Classwork : Students draw the outline of their photograph in the grid produced for the last homework. At this stage no tone/shading should be added, but ensure you draw accurately what you see (and its position) in each box. The level of detail expected can be seen in the example below. Work lightly because you will make errors that will need to be adjusted.

Homework : Complete the outline of your photograph.
Deadline : The deadline will always be your next Art lesson unless stated otherwise on MILK.
Lesson 15
Classwork : Complete the self-portrait gridded enlargement drawing over the next two week (some classes will miss Lesson 12). Students can decide to leave the drawing as a detailed ‘line drawing’ without shading.
if students do think they have time to add shading (don’t rush…it will take about 4hrs!), in the first week (Lesson 11) it is suggested that you start by adding with the eyes, and then add shading/tone to the nose, mouth face, neck and ears using a stump or a cotton wool bud, then also add detail and shading to the hair.
Below is how a good example should look when it is presented in sketchbooks, and also further guidance showing different standards.
Homework : Complete the portrait drawing. If students decide to aadd shading they can see examples by clicking on the ‘Gridded Enlargement Guidance button above.
Deadline : The deadline will always be your next Art lesson unless stated otherwise on MILK.